Forward Messages
We give you the ability to forward all mail being sent to you, to another address. This can be done in both the webmail, the User Control Panel, and the Ness Web Solutions Client Portal
Enable Forwarding in Webmail
- Login to your webmail: https://login.emailarray.com
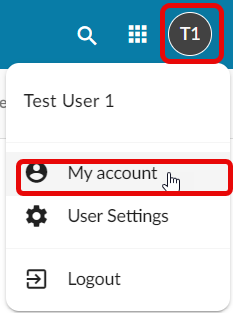
- Click on the circle in the upper right hand corner, with your initals in it
- Click on My Account

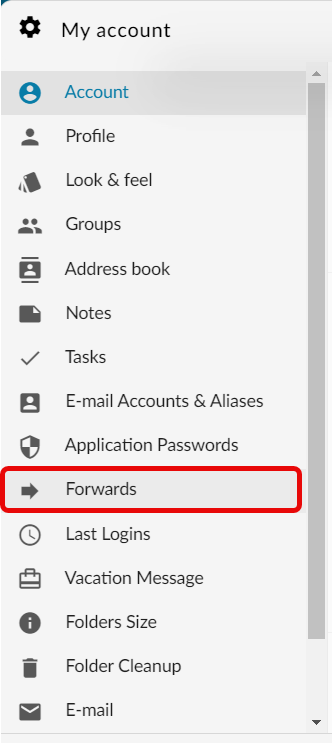
- On the right menu, click on Forwards, you may have to scroll down if you don't see it.

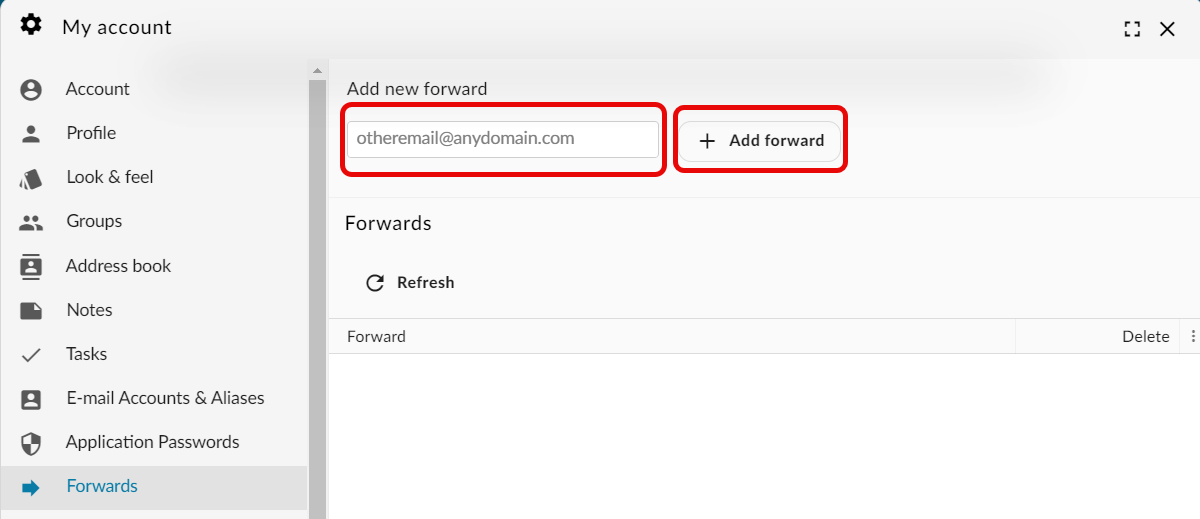
- Enter in the email address you want messages being fowarded to, and click Add Forward

- You will get a confirmation message saying it was successful
Enable Forwarding in User Control Panel
- Login to the User Control Panel: https://cp.emailarray.com
- Click Forwards
- Enter in the email address
- Click Add Forward
Enable Forwarding in Client Portal
- Login to the Client Portal: https://my.nesswebsolutions.com/clientarea/
- Navigate to you Email product
- Click on Manage Fowards in the leftside menu
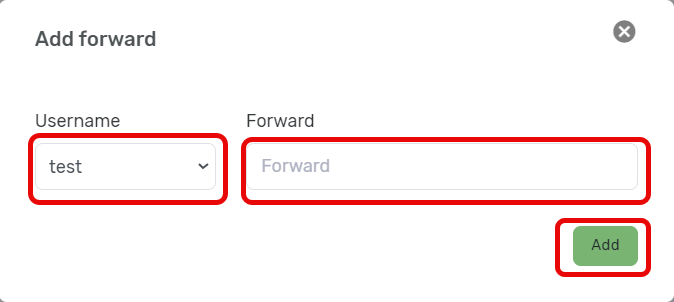
- Click on Add Foward on the right side of the screen

- Under the username dropdown, select the user you want the forward for
- Under foward, enter in the email address you want the emails forwarded to
- Click Add

- Once the forwarded address is added successfully, you will get a confirmation message.

Disable Forwarding in Webmail
- Login to your webmail: https://login.emailarray.com
- Click on the circle in the upper right hand corner, with your initals in it
- Click on My Account

- On the right menu, click on Forwards, you may have to scroll down if you don't see it.

- Hover over the email address you want to end fowarding to, and click the trashcan icon

- After confirming you want to delete the fowarding to that email address, you will receive a confirmation message saying the forwarding has been ended.
Disable Forwarding in User Control Panel
- Login to the User Control Panel: https://cp.emailarray.com
- Click Forwards
- Click minus icon next to the email address that you don't want emails forwarded to

- Confirm you want forwarding ended to that address, and you will then receive a confirmation message.
Disable Forwarding in Client Portal
- Login to the Client Portal: https://my.nesswebsolutions.com/clientarea/
- Navigate to you Email product
- Click on Manage Fowards in the leftside menu
- Click on Delete next to the Fowarder you want deleted

- Confirm you want the forwarded deleted